
Hello to you, friend creator or future creator of poses! In this little guide, I'm going to summarize some essential knowledge to the creation of successful posesas well as useful tips and tricks in special circumstances. I prefer to warn you in advance, this is not a guide that will teach you to understand BlenderThe software we will use here. Also, don't expect to create highly realistic poses the first time around: in general, creating a pose will require at least a few trips back and forth between the game and the Studio. As you go along, these in-game attempts will probably become less frequent, but it does take a little practice!
The Indispensables.
To create poses, you will need to use :
- We start with the Sims 4 Studiowhich you can find right here. It's the essential tool for creating any kind of content in The Sims 4, whether it's clothes, objects or poses, which is what we're interested in here. You need to register on the forum to download the tool, but don't worry, it's absolutely free!
- You will also need the 3D software Blenderto work on your poses. You will find the 64bits version hereor the 32bits version here.
- We will use, to play the poses in game, the Sims 4 Pose Player.
- Second mod, not necessarily essential but really useful, the Sims 4 Teleporterwhich will allow you to easily place your characters in the game.
Simple pose creation.
Once the Studio is launched, you simply click on the big button Animation. The software asks you to register your future installation pack, give it a clear name (for example, Rope_Poses_GroupPicture), especially if you intend to share it later. Back on the interface of the software, you will find yourself in front of this (we will not be interested in the tab Warehouse) :

The Pose Pack tab.
This tab is quite clear I think, it allows you to define what your pose pack will look like (even if there is only one) in the Pose Player. Give it a name, a little description... well, I guess you get the idea.
The only interesting thing to say is about the icon. It should be in the format PNGsize 64×64 pixels.

The Clips tab.
This is where most of the work (on the Studio, anyway) happens! The top frame shows you a list of the poses in your pose pack, you can add or remove the selected pose with the buttons on the side. Again, at the bottom, you can give a name, a description, a specific icon for the pose, which will be used in the pose player list. Nothing very complicated.
A little further down, you will find the two small icons for Import and Export your pose to modify it on Blender. We can use an EA animation as a basis, but we will start with an empty pose (so, we stay on Blank Clip). With the small drop-down menu to the left of the Export, you can choose if you want to work on Blender with a male or female model, but your in-game pose will be usable with both sexes anyway. You can choose Child from the list, but since they have a different skeleton, this pose will only be usable by kids (and conversely, adult poses cannot be used by younger kids).
In short, we select for this example adult malewe can verify that Blank Clipand click on export. Save it wherever you want, where you can find it.

Here we are on Blender. I don't pretend to teach you how to use the software, that's not the purpose of this tutorial. But here are some useful shortcuts, copied and pasted from the Chicken tutorial for Creating Poses for The Sims 3 :
Move the view.
- To rotate the view, hold the wheel of your mouse pressed down in the 3D view, and move your mouse.
- To move the view, hold the wheel of your mouse and the SHIFT (the up arrow on the far left of the keyboard) pressed in the 3D view, and move your mouse.
- For specific viewpoints: press the 1 of the keypad to get a front view, 3 for a side view, and 7 for a top view. For views in the other direction, hold CTRL at the same time: for example,CTRL+1 gives a back view.
Select joints.
- You can select them directly from the 3D view, by simply doing a right click on one of the small spheres. This one will light up in blue, signalling that it is selected.
- Press the A on the keyboard to select or deselect all the joints. If they are all selected, they will all light up in blue.
- To move the entire model, click on the joint located in the middle of the pelvis and move it: your whole model should normally move with it. (Third image)Don't forget that to undo an action, you can click on CTRL+Z
That's it, as far as moving in 3D and selecting joints is concerned. For the rest, let's have a look at the interface:
1 - Nothing to touch here, in principle, just make sure you are always in Pose Mode for your manipulations.
2 - Here are the different icons for the manipulation of your joints. The first one allows you to movethe joint, it will only be used only in special casesThe first one is for the joints of the face, or to move the whole model by selecting the point in the middle of the pelvis. The third one is totally useless for creating a pose, you don't click on it.
This is the second one, which allows to make a rotation on the joints, which interests us. It is in rotation mode, therefore, that we will manipulate our joints for the most part. When you switch to rotation mode, if you have selected a joint in the 3D window (in 4), you will see rotation axes (see in 5). Click on one of the three circles, hold the click and move your mouse, to perform the rotation. You can also press the R to make a rotation on a joint, but it is less obvious.
3 - Speaking of axes. You will be in the basic mode GlobalThe rotation axes will remain fixed no matter what you do, aligned with the basic axes of the 3D view. But here is the problem. Some of our joints can only bend in one axis, in real life. Your elbows for example: you can bend your arm, but to move it on other axes, it is the whole arm that moves. It is the same for your knee joints, your fingers. That's why I almost always switch to the Local : the rotation axes are now always aligned with the selected joint. So, in the example of the image, in 5, rotate your elbow only on the blue axis (Yes, it's a circle, but I had the bad idea to align the view when taking my screen), if you want to create a realistic pose. Your elbow joint, in real life, can't move in the other two axes.
From there, I'll let you experiment, and manipulate. It will take you some time to get the hang of it!
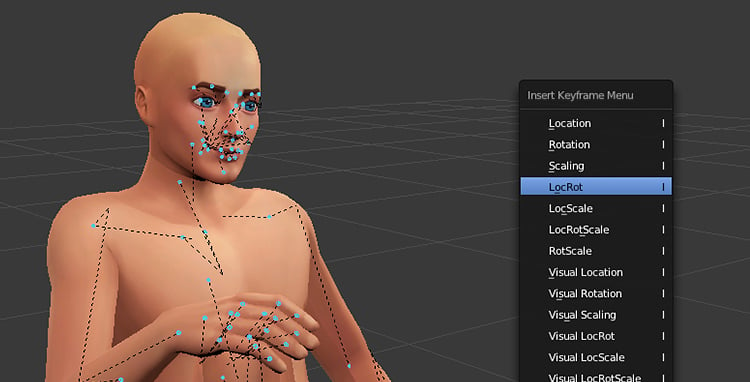
So, once you've created your pose, you'll want to test it in game! Before saving, select all your joints (press the AIf you have already selected a joint, press the key twice (all the joints will appear in blue), then press the key I to display the small drop-down menu shown above, and choose LocRot.
Now just save your Blender file, go back to the Studio, andImport using the corresponding button (below the Export so). Then save your package file, put it in your Mod folder if you haven't already done so, and let's test it.
The in-game test.
♦ A little parenthesis on the Teleport Any Sims.
We could directly test on the pose on any sim in game, but you may want to place your sim in a specific spot to take the break. That's where this mod comes in! Look for it in the category Various decorations this armor:
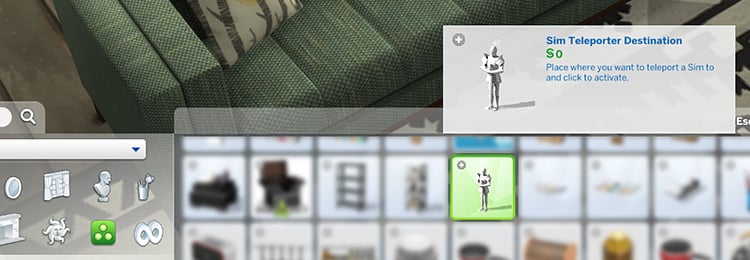
Place it where you want your sims to be, point it in the right direction, place it a little higher if you have to, using the 9 and 0 keys (with bb.moveobjects activated). If you need to pose multiple sims, place all your armor at once: placing or moving objects, any of them, near a sim resets it and moves it.
Once this is in place, go back to life mode, put the game in pose, and click on the armor to teleport your sims, by clicking on the Teleport a Sim Here if he is on the field, or Summon a Sim to Here if it is elsewhere. It appears in the place of the armor (this one disappears), ready to be put in pose.
Test your pose!
Now, nothing could be easier. Click on your sims, and choose the interaction Pose by Pack. A list appears, and you should find the pose pack you created, with its name and description.

Then comes the list of the different poses in the pack. I'm not going to draw you a picture, just select the pose, and... voilà! All you have to do is look at the result. If there are any changes to be made, simply restart the Studio, click in the basic menu on My ProjectsClick on the button, and go to the file of your installation package (or just below the button, click on the name of your package, if it appears in the list of last modified files). Re-export your pose if you no longer have the file Blenderor open it directly if you still have it. Then repeat the steps from the opening of the file, make your changes, think of the LocRot before saving, and import.

And that's how this tutorial ends! I hope it will be clear enough for you, and will allow you to start creating poses and staging in game. I'll expand the tutorial later, there are still a few things I'd like to talk about for more complex things, like creating a pose with several Sims, or in relation to an object, or poses that can be used in CAS.
And good creation!
Super ce tuto Merci Rope
I'm just starting to open blender and it looks clear to me. It's going to be great to test it out.
Yes exactly, thank you Lin'!
Are you talking about importing a pose into Blender, Elodie? If so, you can. You open the package of the pose you want to modify with Sims 4 Studio, for example, export the pose to Blender (.blend file), modify it, and then import your new pose back into Sims 4 Studio.
I'm taking the liberty of replying to you, because I've already done so (for the action film in the Casting Actor competition). I hope Rope won't be offended ;)
Thanks for this tuto! :)
Is it possible, as in Sims 3, to import an existing pose and modify it?
Thank you both.
Feel free to put a little thank you on the first post, if this tuto is useful to you (I beg!), so I know if it's worth writing the sequel (because it takes time!).
A very practical teleportation mod!
Thanks for the Rope tutorial!
Thanks for the reminder and for the teleport tip, which I didn't know!