
All the players of the Sims 2 Ultimate Collection have noticed, the game is not at all optimized for new screens with a resolution that does not exceed 800×600 by default. Here's how to increase this limit.
Using the Graphic Rules Maker
If you don't feel comfortable editing the game files yourself or if you're just a bit lazy, the Sims Network website has designed a software that will do it for you. Start by downloading it here: Graphic Rules Maker. Once installed, you just have to launch it to arrive on this window:
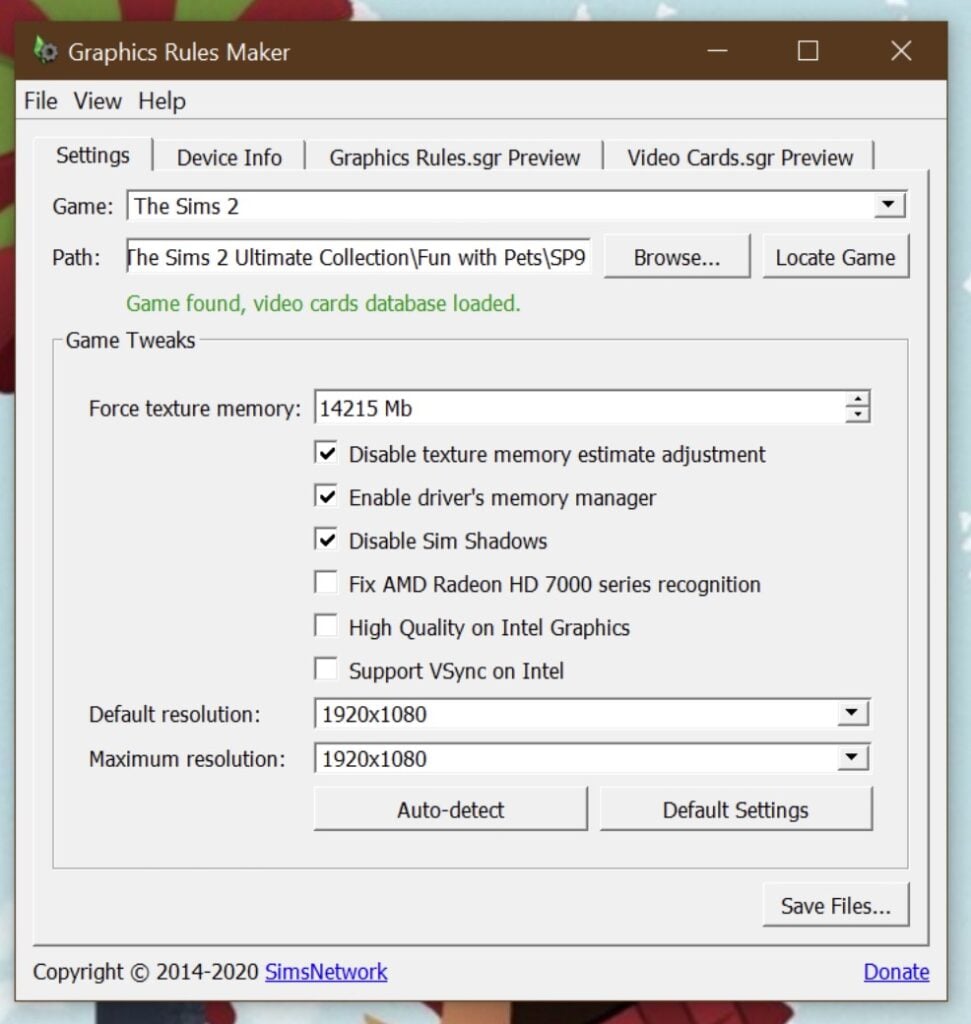
Your game should have been found automatically. If not, click on "Locate Game" to locate it automatically, or on "Browse" to find the game exe file. If you're using The Sims 2 Ultimate Collection, your game is in C:\Program Files (x86)\Origin Games\The Sims 2 Ultimate Collection\Fun with PetsSP9
Next comes the game configuration step. You can click on "Auto-detect" to have the tool select the options that are appropriate for your graphics card. You can then customize the options.
- "Force texture memory" allows you to set the amount of memory allocated to the game.
- The two options "Disable texture memory estimate adjustment" and "Enable driver's memory manager" should not be affected, unchecking them could affect the stability of the game.
- "Disable Sim Shadow" allows you to remove the big black square under the Sims instead of their shadow
- "Fix AMD Radeon HD 7000" and "High Quality on Intel Graphics" allow to apply high definition if you have a graphics card of this series. No impact if you have another card.
- Finally, "Support VSync on Intel" allows you to enable vertical synchronization if you have an Intel graphics card.
Next are the resolution options that we are interested in. You can choose the default resolution when you start the game and the maximum one that you can select in the game options. Both can be the same.
When finished, simply click on "Save files" to save the options.
Manually edit game files
Please note that, as with any operation involving game files, it is important to make a copy before editing.
Time 10 minutes
Open the GraphicRules file
Open the file GraphicRules.sgr located in C:\Program Files (x86)\Origin Games\The Sims 2 Ultimate Collection\Fun with Pets\SP9\TSDataRes\Config (this is the default location, if you changed the directory during installation, the path changes slightly). You will probably need challengend which software to use to open the file. An editor like Notepad will suffice.
Change the default graphic quality
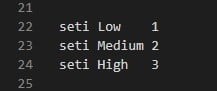
In the first few lines, you will find "seti Low 1", "seti Medium 2" and "seti High 3". Change 1 and 2 to 3. This will allow the game to default to High graphics settings, regardless of your graphics card.
Look for the ScreenModeResolution part
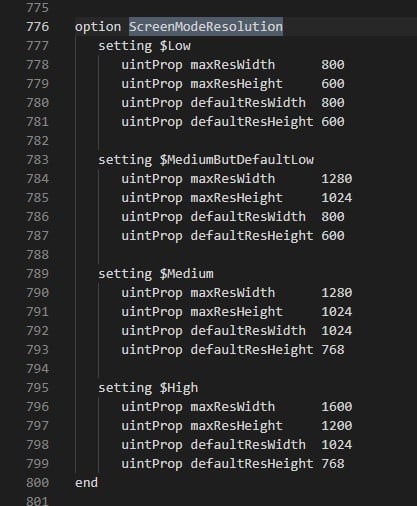
Press the Ctrl and F keys and in the window that appears, type ScreenModeResolution and click on Search.
Enter your screen resolution
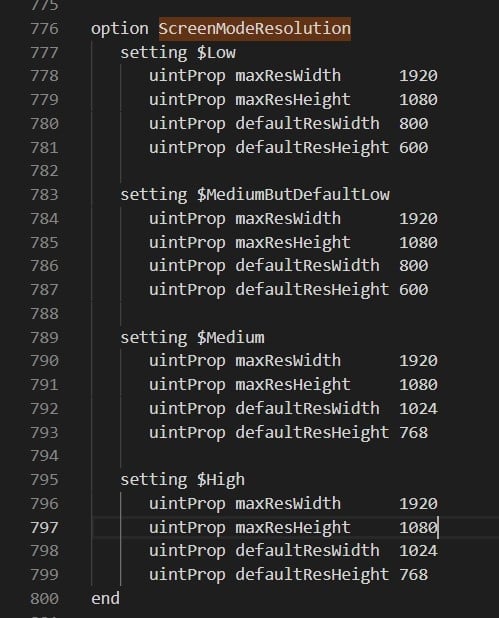
Now you have to define the size of your screen. For example, my resolution is 1920×1080 so I replace the values of "maxResWidth" by 1920 and "maxResHeight" by 1080
Test
Save and start your game. What we have changed are the maximum sizes the game can accept. Not the current value. So now you go to the game settings and select the resolution you want.
Thank you for the precious help!
The -w forces the windowed mode so if it is present it is normal that you can't change. Regarding the message with the graphics card, you can try the Graphic Rules Maker, it's a small program that changes the game settings to be compatible with the latest generation of computers: https://www.simsnetwork.com/tools/graphics-rules-maker (with a French tutorial here if needed: https://sims-artists.forumactif.com/t12144-fiche-graphics-rules-maker )
I have done everything and the game always launches in window mode without any other choice in the settings. But if I remove the "-w" in property then the game does not launch and gives me a graphics card error message.
It also works for Histoire de Vie! Thanks a lot :) It really helped me x)
It works. Thanks a lot!