Create a custom animation with Milkshape? There's nothing complicated about it. However, it is imperative to master the creation of the installation!
I will not repeat what has already been explained by The Chicken in his tuto : Create a custom pose with Milkshape or Blender Note that if you use Blender, Minaya has written a very good tutorial explaining how to proceed. To be found here.
What you need (same materials as for poses):
- S3PE
- The animtool version 5
- The rigs for man or woman
- Milkshape version 1.8.5 (paid software)
- The animation player
Small glossary of specific terms:
- Joint: one or more limb segments appear blue (or yellow) as you move from the Rotate and Move modes.
- Frame : instantaneous image which allows the decomposition of the movement. I don't know the frame rate. Maybe 50/s.
- Set keyframe: lock your pose at time t
Ready to go? Let's go!
Preparation
To recover your basic animation, it is the same method as for the poses. Open S3PE. Dans File > Open, allez chercher le fichier FullBuild0 (Programmes > Electronic Arts > Les Sims 3 > GameData > Shared).
Vérifiez que Sort, Names et Tags sont bien coché dans la barre du bas. Triez les fichiers en cliquant sur Name puis Tag. Descendez dans la liste jusqu’à trouver le CLIP « a_xevt_701 ». Faites un clic droit et exportez le : « Export and rename… ».
Rename the clip, remembering to keep the a_ at the beginning. Finally, save it.

Now open theAnimTool. It is always the same as for the poses. Convert the CLIP to an SMD file. To do this, click on "Clip -> SMD" and select the file you just saved. Then the software will ask you to locate the rig. Choose the rig for male or female depending on the animation you want to create. Validate.
The preparation of the basic animation is finished. It is time to move on to the creation under Milkshape.
Creation
Lancez le logiciel. Ouvrez le rig du sexe que vous avez choisi (File > Open). Puis, allez chercher votre animation de base. Pour cela, dans File, faites Import et sélectionnez le type de fichier, dans notre cas, « Half-Life SMD ». Ouvrez l’animation. Et cliquez sur le bouton « Anim ».
Some tips for working in the best conditions:
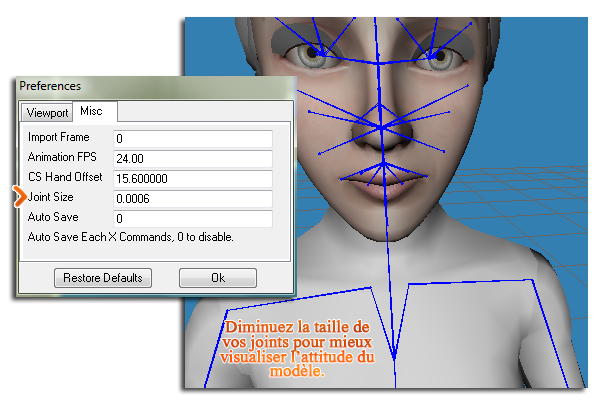
- Diminuez la taille de vos joints pour avoir une meilleure appréciation du modèle. Ouvrez la fenêtre des Préférences (File > Preferences). Dans l’onglet Misc, changez la taille des joints (Joint size), passez là de 1.0000 par défaut à 0.00006. Validez.
- Add texture to the eyes and face. Le Poulet explains everything at the end of his pose creation tuto.
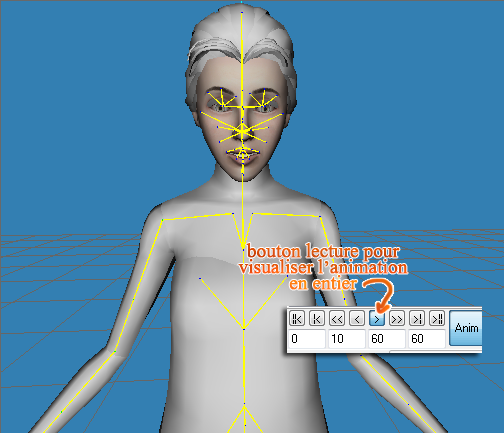
Let's take a look at the animation bar at the bottom of the window. You have a sort of slider with a cursor and, on the right, play and advance arrows as well as 4 boxes with numbers and the famous "Anim" button.

The most difficult part of creating animation is finding the right rhythm. It takes about :
- For a very brief action such as a laugh (which will require the movement to be very decomposed): 10 frames
- For a quick but simple movement: 30-40 frames
- For a slow movement: 100 frames
This is just an idea, you will know how to measure it with practice. You must also take into account the amplitude of the movement: for the same number of framesThis is why I'm going to talk to you in terms of the speed at which you can do it, whether it's clapping your hands or flapping your arms. That's why I'll talk to you in frames than in units of time.
You should also know that 50 frames does not equal 50 poses. That would be far too long and tedious to do. Between each position, and depending on the interval of frames left, the software takes care of the movement. Be careful, it will take the shortest way!
Now you can calculate the total number of frames necessary, knowing the number of positions and the interval of frames between each. Enter it in the boxes as described above. Do not change it during the game, as this may cause bugs in the game.
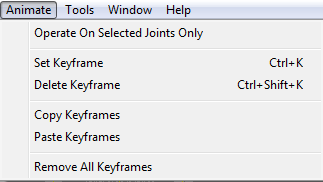
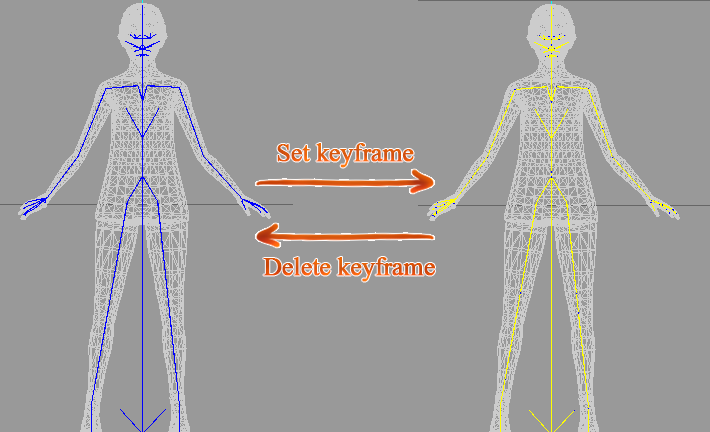
At frame 1, create your first pose. Once satisfied, lock it by doing Animate > Set keyframe. The blue joints should turn yellow.
Then move your spinner several frames and create a new pose. Set keyframe to lock. And so on until you are finished.
Vous pouvez aussi copier une position (dans Animate > Copy keyframes) puis coller la plusieurs frames plus loin (Animation > Paste keyframes) et n’oubliez pas de faire « Set keyframe ». Ca vous évitera de refaire deux fois la même pose. C’est aussi utile si vous avez besoin de marquer une pause dans le mouvement. Par exemple sur 10 families interval your sims stays in the same position.
Si vous avez besoin de modifier une pose déjà verrouillée, faites « Delete keyframe » (toujours dans Animation) : les joints jaunes passent au bleu.
When you have finished your animation, you can play it by pressing this button:
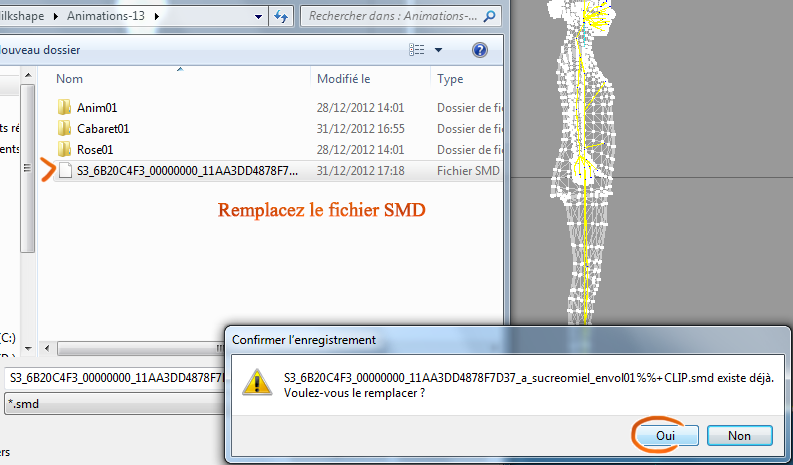
Final step under Milkshape, exporter l’animation. Cliquez sur « Anim », le modèle revient à la position initiale. Dans File > Export, choisissez le format « Half-Life SMD » et remplacez le fichier SMD. Sauvegardez en cochant bien « Sequence ».
Export
The animation is created, we just have to convert it. Same process as for the poses.
Open theAnimtoolClick on "SMD -> CLIP". Select the file ANIMATION and validate.
Finally, we will wrap the animation. Open S3PEand then File > New. In the Resource menu, import "from file" the CLIP. Retournez dans File puis enregistrez votre animation en cliquant sur « Save as ». Pensez à placer votre package dans le dossier Mods.
It's time to test your creation in game
Place theAnimation Player sur votre terrain. Cliquez sur l’objet et sélectionnez « add to playslist ». Là il vous sera demander d’entrer le nom de votre animation, celui que l’on a défini dans s3pe lors de l’enregistrement (« a_lenomdemapose »). Validez. Lorsque vous cliquez à nouveau sur le clap, vous pouvez jouer votre animation : « Play ».
Oh dear, I was sure he'd included it in his tutorial. In fact, it was on LS3 that he shared these textures. You do the same as with the eyes, except you select Face.
Here are the links to download the textures created by Le Poulet: type 1 ( https://www.mediafire.com/file/p2web4piwzri97h/Sourcils1.dds/file ) and type 2 ( https://www.mediafire.com/file/lbivt5a50nvcj66/Sourcils2.dds/file ).
Thank you very much Sucrée!
Your animation is very well done :)
However, how do you apply the texture to the skin? (Poulet only explains how to apply it to the eyes in her tutorial).
Thank you Sucré for sharing your knowledge with us and for posting this tutorial here too :)